

Forces and sport
View Sequence overviewStudents will:
- identify individual forces acting on an object.
- combine individual forces to find the net force acting on an object.
- represent forces using arrows on a force diagram.
- generate and record data with precision.
Students will represent their understanding as they:
- draw force diagrams using arrows to show the direction and relative magnitude of forces acting on an object.
- determine the net force acting on an object.
- use the symbol N when writing the magnitude of force.
In this lesson, assessment is formative.
Feedback might focus on students’ ability to:
- plan and conduct an investigation.
- construct a hypothesis.
- record data, perform a calculation and analyse the results.
- draw a conclusion about the effect of the magnitude and direction of forces on the net force acting on an object.
- represent forces using force arrows.
Possible summative assessment
Students working at the achievement standard should:
- represent forces acting on objects.
- plan and conduct safe, reproducible investigations to test relationships.
- use equipment to generate and record data with precision.
Refer to the Australian Curriculum content links on the Our design decisions tab for further information.
Whole class
Forces and sport Slides
Each group
Wooden block with a push pin or nail inserted into the middle (see the Preparing for this sequence tab on the sequence overview)
2 x identical elastic bands
Butchers paper
Marker pens
Scientific calculator
30 cm ruler
Each student
Individual science notebook
Forces and sport Poster
Forces in different directions Resource sheet
Access to the PhET Forces and motion: basics computer simulation model
Net force simulation Resource sheet
Optional: Forces in the same direction Resource sheet
Lesson
The Inquire phase allows students to cycle progressively and with increasing complexity through the key science ideas related to the core concepts. Each Inquire cycle is divided into three teaching and learning routines that allow students to systematically build their knowledge and skills in science and incorporate this into their current understanding of the world.
When designing a teaching sequence, it is important to consider the knowledge and skills that students will need in the final Act phase. Consider what the students already know and identify the steps that need to be taken to reach the level required. How could you facilitate students’ understanding at each step? What investigations could be designed to build the skills at each step?
Read more about using the LIA FrameworkRe-orient
Recall the previous lesson, focusing on forces in sport and the definitions of force. Discuss any questions the students may have about forces. Use the Forces and sport Poster as a visual prompt for students if needed.
(Slide 11) Invite students to find examples of these statements about forces in the picture of the bike rider shown on the slide.
- A force is a push or pull that acts on an object when it interacts with another object.
- Some forces cause movement such as changing direction or speeding up or slowing down.
- Other forces are balanced, and the object’s motion remains unchanged.
- Where do we see the effects of forces?
- The rider is doing a wheelie. What forces did the rider exert on the bike to cause this movement?
- Can you identify a pair of forces that might be the same size but acting in opposite directions on an object?
The Inquire phase allows students to cycle progressively and with increasing complexity through the key science ideas related to the core concepts. Each Inquire cycle is divided into three teaching and learning routines that allow students to systematically build their knowledge and skills in science and incorporate this into their current understanding of the world.
When designing a teaching sequence, it is important to consider the knowledge and skills that students will need in the final Act phase. Consider what the students already know and identify the steps that need to be taken to reach the level required. How could you facilitate students’ understanding at each step? What investigations could be designed to build the skills at each step?
Read more about using the LIA FrameworkIdentifying and constructing questions is the creative driver of the inquiry process. It allows students to explore what they know and how they know it. During the Inquire phase of the LIA Framework, the Question routine allows for past activities to be reviewed and to set the scene for the investigation that students will undertake. The use of effective questioning techniques can influence students’ view and interpretation of upcoming content, open them to exploration and link to their current interests and science capital.
When designing a teaching sequence, it is important to spend some time considering the mindset of students at the start of each Inquire phase. What do you want students to be thinking about, what do they already know and what is the best way for them to approach the task? What might tap into their curiosity?
Read more about using the LIA FrameworkDirections of forces
(Slide 12) Pose the questions: What happens when forces act in different directions? Why?
(Slide 13) Explain that forces have both size (which is called “magnitude”) and a direction.
Referring to the sports images shown on the slide, ask students to identify forces acting in different and similar directions and to identify what the force is acting on.
Explain that forces can act on the same object or different objects. If forces are acting on the same object, they can balance, resulting in no changes in motion. Alternatively, forces can be unbalanced and lead to starting motion, stopping motion, or result in a change of speed or direction. Invite students to identify if the forces acting on an object are causing or stopping movement.
✎STUDENT NOTES: Write a sentence describing forces having a size/magnitude and direction.
- What are the forces acting on the ball? Which directions are these forces acting?
- What forces is the swimmer exerting on the water? What effect do these forces have on the swimmer’s motion?
- Are there examples of forces pushing against each other?
- The tennis ball is pushing against the racket, and the racket is pushing back on the ball.
- The hockey sticks are pushing against each other in opposite directions.
The Inquire phase allows students to cycle progressively and with increasing complexity through the key science ideas related to the core concepts. Each Inquire cycle is divided into three teaching and learning routines that allow students to systematically build their knowledge and skills in science and incorporate this into their current understanding of the world.
When designing a teaching sequence, it is important to consider the knowledge and skills that students will need in the final Act phase. Consider what the students already know and identify the steps that need to be taken to reach the level required. How could you facilitate students’ understanding at each step? What investigations could be designed to build the skills at each step?
Read more about using the LIA FrameworkThe Investigate routine provides students with an opportunity to explore the key ideas of science, to plan and conduct an investigation, and to gather and record data. The investigations are designed to systematically develop content knowledge and skills through increasingly complex processes of structured inquiry, guided inquiry and open inquiry approaches. Students are encouraged to process data to identify trends and patterns and link them to the real-world context of the teaching sequence.
When designing a teaching sequence, consider the diagnostic assessment (Launch phase) that identified the alternative conceptions that students held. Are there activities that challenge these ideas and provide openings for discussion? What content knowledge and skills do students need to be able to complete the final (Act phase) task? How could you systematically build these through the investigation routines? Are there opportunities to build students’ understanding and skills in the science inquiry processes through the successive investigations?
Read more about using the LIA FrameworkModelling forces
Discuss how students could investigate the lesson question using a small model.
(Slide 14) Introduce the model shown on the slide and discuss how elastic bands provide forces acting on the block.
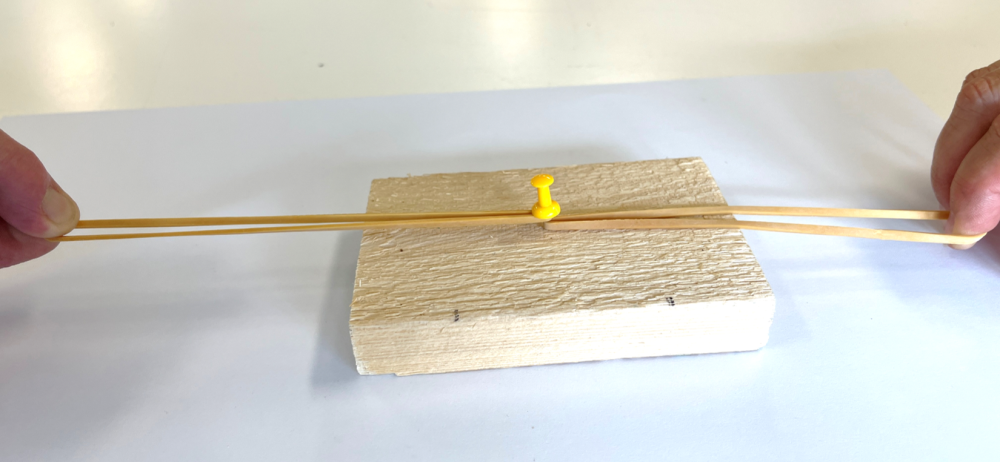
Provide students with a copy of Investigating forces - Forces in different directions Resource sheet.
Students read through the investigation, allocate roles, collect equipment and conduct the investigation.
- Place the wooden block and pin on the butchers paper. Put two elastic bands around the pin/nail. Trace around the block to show your starting position.
- One team member holds the block stationary inside the traced shape. Two other team members gently pull the elastic bands equal distance (or force) from either end of the block.
- Another team member draws accurate arrows on the butchers paper alongside each stretched band, showing the distance they are stretched. Label these arrows “Pull force left” and “Pull force right”.
- Release the bands at the same time. Draw an accurate arrow to indicate the distance the edge of the block travelled in the direction of either band. Label the arrow as “Final force”, measure and record in the results table. Repeat the experiment another two times if time allows.
- Repeat steps 1 and 2, but this time the two team members pull back the bands different distances: one pulls their band same distance as previously, the other pulls their band twice the distance as previously.
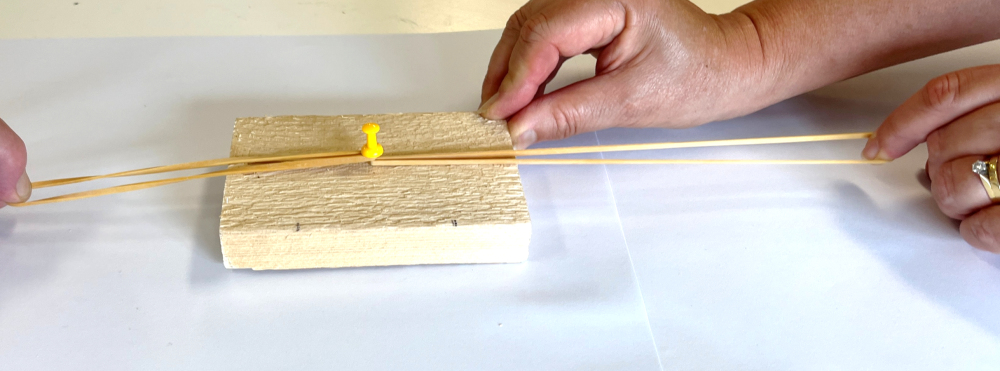
- Another team member draws accurate arrows on the butchers paper alongside each stretched band. Label these arrows “Pull force left” and “Pull force right”.
- Release the bands at the same time. Draw an accurate arrow to indicate the distance the edge of the block travelled in the direction of either band. Label the arrow as “Final force”, measure and record in the results table. Repeat the experiment another two times if time allows.
✎STUDENT NOTES: Complete the Results table of Investigating forces—Forces in different directions Resource sheet.
If required, guide students through the process of calculating an average of the three trials using this formula:
$$ \text{Average}=\frac{\text{distance}_\text{trial 1}+\text{distance}_\text{trial 2}+\text{distance}_\text{trial 3}}{\text{number of trials}}$$
Optional: If time allows, extend students’ understanding of unbalanced forces by completing the Forces in the same direction investigation.
(Slide 15) Pose the questions: What happens when forces act in the same direction? Why?
Provide students with a copy of Investigating forces - Forces in the same direction Resource sheet.
Students read through the investigation, allocate roles, collect equipment and conduct the investigation.
Procedure
- Place the wooden block and pin on the butchers paper. Put an elastic band around the pin/nail. Trace around the block to show your starting position.
- One team member holds the block stationary inside the traced shape. One team member pulls one elastic band the same distance (or force) as the previous experiment on one side of the block.
- Another team member draws an accurate arrow on the butchers paper alongside the stretched band. Label this arrow as “Pull force 1”.
- Release the band. Draw an accurate arrow to indicate the distance the edge of the block travelled in the direction of the band. Label the arrow as “Final force”, measure and record in the results table. Repeat the experiment another two times if time allows.
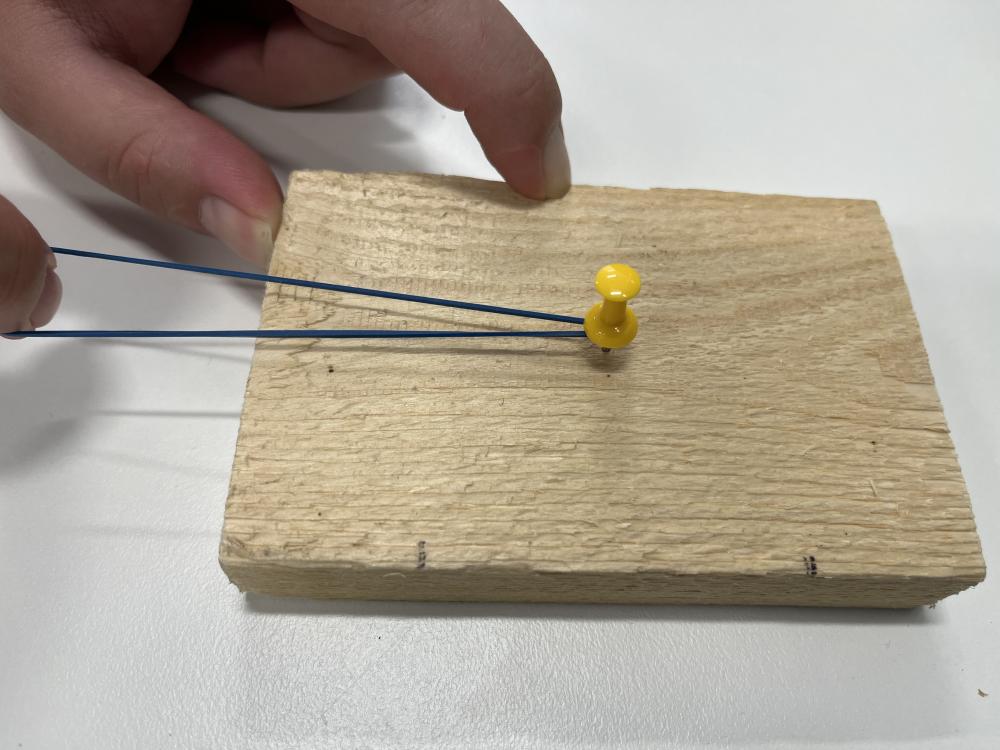
- Place the block with pin on a new piece of butchers paper. Put an elastic band around the pin/nail. Trace around the block to show your starting position.
- One team member holds the block stationary inside the traced shape. One team member pulls two elastic bands the same distance (or force) as the previous experiment on one side of the block.
- Another team member draws accurate arrows on the butchers paper alongside each of the stretched bands. Label these arrows as “Pull force 1” and “Pull force 2”.
- Release the bands at the same time. Draw an accurate arrow to indicate the distance the block travelled in the direction of the bands. Label this arrow as “Final force”, measure and record in the results table. Repeat the experiment another two times if time allows.
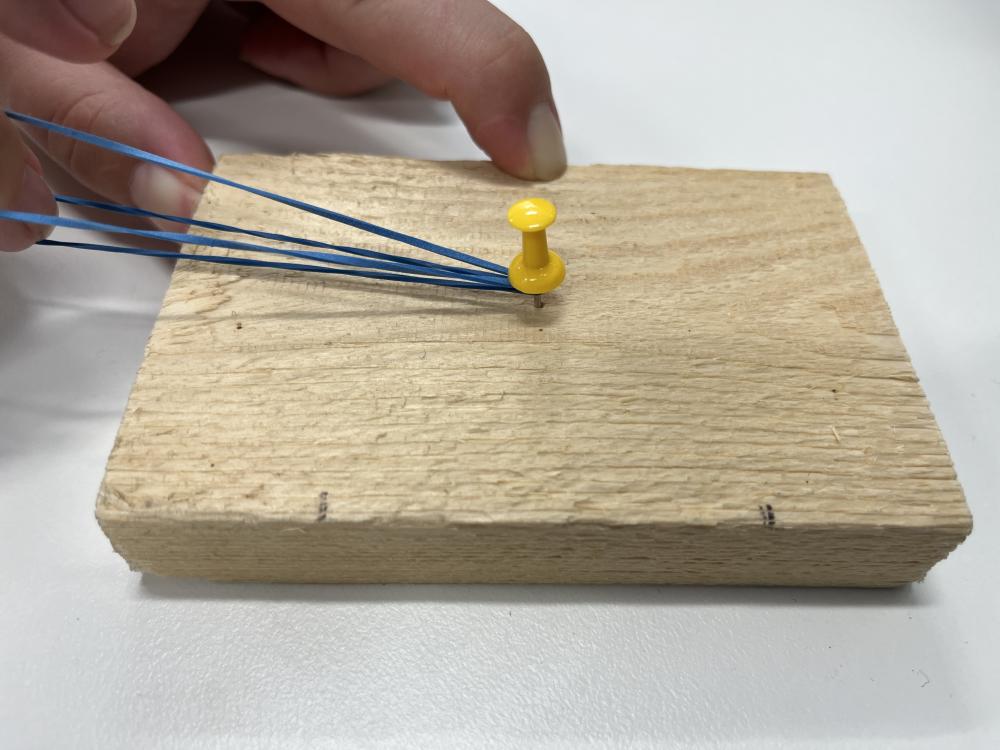
✎STUDENT NOTES: Record the distance travelled by the wooden block in the results table.
Balanced and unbalanced forces
An object can have more than one force acting on it. These forces can be combined to calculate the net force.
When all the forces acting on an object balance (or combine to give zero net force), the object’s motion will not change. If there is no net force, the object will stay stationary or continue moving at a constant speed or velocity.
If an object has a final force left over after we consider all the forces acting on it, it is described as having “unbalanced forces” which results in a net force acting on it. Unbalanced forces cause an object to accelerate—speed up, slow down or change direction.
Net force and the block activity
When an elastic band is stretched, it stores energy and pulls back with a restoring force that tries to return it to its original shape. Generally, increasing the stretch of an elastic band increases the restoring force it produces. This is represented by the arrows (a pull force) that students draw in this investigation. The independent variable is how far the elastic band is stretched (the force applied), and the dependent variable is how far the block travels (a measurement of its change in motion). When the band is stretched a greater distance, the block will usually travel a greater distance. Using newer elastic bands will produce more consistent results.
Representing forces using arrows
Arrows pointing in different directions can be used to illustrate that a net force is determined by adding the magnitudes and directions of all the forces acting on the block.
The rule for adding force arrows (or vectors) is to put them head-to-tail without changing their direction. The arrow needed to fill the gap between the start of the first arrow and the tip of the last arrow is the sum of all the forces (or net force). Arrows can be added and may result in a zero net force.
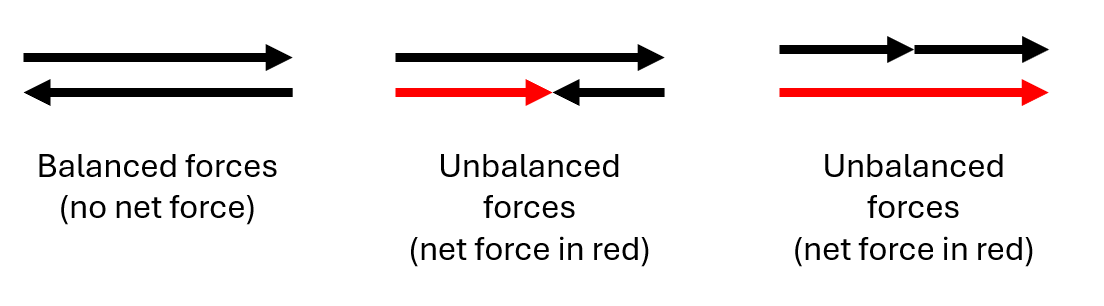
When all the forces acting on an object balance (or combine to give zero net force), the object’s motion will not change. If there is no net force, the object will stay stationary or continue moving at a constant speed or velocity.
If an object has a final force left over after we consider all the forces acting on it, it is described as having “unbalanced forces” which results in a net force acting on it. Unbalanced forces cause an object to accelerate—speed up, slow down or change direction.
Net force and the block activity
When an elastic band is stretched, it stores energy and pulls back with a restoring force that tries to return it to its original shape. Generally, increasing the stretch of an elastic band increases the restoring force it produces. This is represented by the arrows (a pull force) that students draw in this investigation. The independent variable is how far the elastic band is stretched (the force applied), and the dependent variable is how far the block travels (a measurement of its change in motion). When the band is stretched a greater distance, the block will usually travel a greater distance. Using newer elastic bands will produce more consistent results.
Representing forces using arrows
Arrows pointing in different directions can be used to illustrate that a net force is determined by adding the magnitudes and directions of all the forces acting on the block.
The rule for adding force arrows (or vectors) is to put them head-to-tail without changing their direction. The arrow needed to fill the gap between the start of the first arrow and the tip of the last arrow is the sum of all the forces (or net force). Arrows can be added and may result in a zero net force.
The Inquire phase allows students to cycle progressively and with increasing complexity through the key science ideas related to the core concepts. Each Inquire cycle is divided into three teaching and learning routines that allow students to systematically build their knowledge and skills in science and incorporate this into their current understanding of the world.
When designing a teaching sequence, it is important to consider the knowledge and skills that students will need in the final Act phase. Consider what the students already know and identify the steps that need to be taken to reach the level required. How could you facilitate students’ understanding at each step? What investigations could be designed to build the skills at each step?
Read more about using the LIA FrameworkFollowing an investigation, the Integrate routine provides time and space for data to be evaluated and insights to be synthesized. It reveals new insights, consolidates and refines representations, generalises context and broadens students’ perspectives. It allows student thinking to become visible and opens formative feedback opportunities. It may also lead to further questions being asked, allowing the Inquire phase to start again.
When designing a teaching sequence, consider the diagnostic assessment that was undertaken during the Launch phase. Consider if alternative conceptions could be used as a jumping off point to discussions. How could students represent their learning in a way that would support formative feedback opportunities? Could small summative assessment occur at different stages in the teaching sequence?
Read more about using the LIA FrameworkNet force
Discuss and compare students’ results for the investigation/s. Invite students to explain why the block moved in one instance and not in the other.
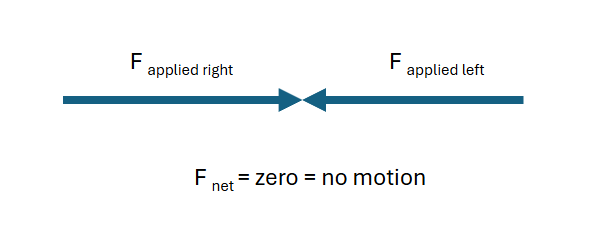
(Slide 17) Explain that in the first part of the investigation, the forces were balanced (of equal magnitude or size and acting in opposite directions on the block). This resulted in a zero net force and the block remains stationary.
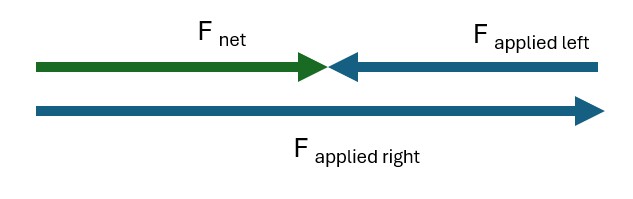
(Slide 18) Explain that in the second part of the investigation, the forces were acting in opposite directions on the block, but they were not of equal size or magnitude, so the net force was not zero. These unbalanced forces caused motion to occur. The net force can be calculated by subtracting the forces to determine the direction of motion.
✎STUDENT NOTES: Complete the Discussion section of Investigating forces - Forces in different directions Resource sheet.
Discuss and compare the results of the two force scenarios in the optional investigation. Ask students to explain the movement of each block using force arrows.
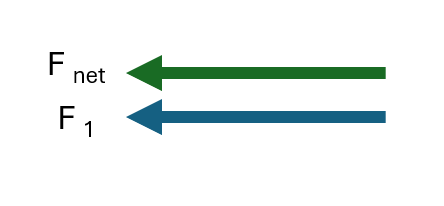
(Slide 19) Guide students through the force diagram to show the unbalanced force on the block and the net force in each scenario. Draw the force diagrams to aid your explanation.
One band:
Two bands in the same direction:
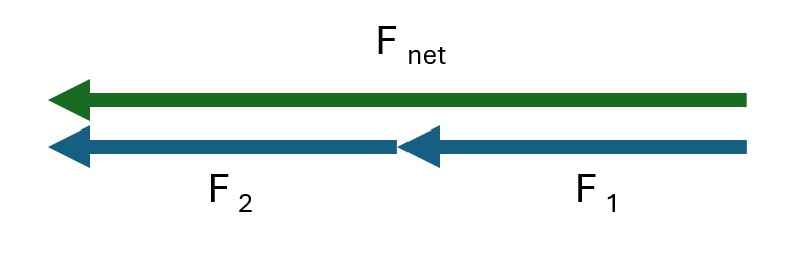
Explain that when forces act on the object in the same direction, the net force is determined by adding the forces.
✎STUDENT NOTES: Complete the Discussion section of the Investigating forces—Forces in the same direction Resource sheet.
(Slide 20) Introduce how scientists use different models to help them understand, explain, or test their hypotheses. Discuss how the investigation used a physical model to test how different forces interact to produce a net force.
Explain that all models are limited, and this physical model is limited to small forces in only a few directions because that is what can be produced in the classroom. Introduce the PhET Forces and motion: basics computer simulation model. This model allows students to explore their ideas through real-world examples without needing to physically do the activity.
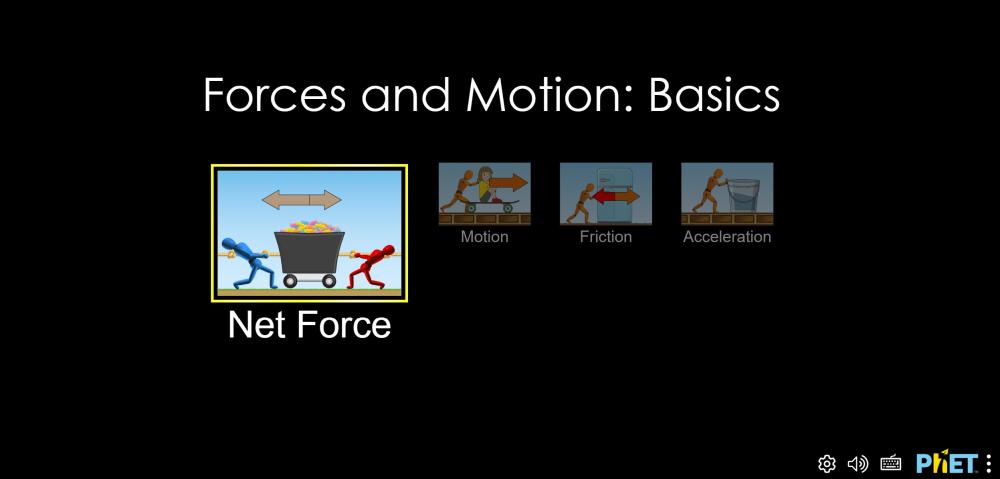
Distribute the Net force simulation Resource sheet. Explain that in this activity, students will be using their understanding of net force to complete two challenges: creating a situation where forces on an object are balanced and creating a situation where the forces are unbalanced.
Allow students time to work through the instructions for using the simulation and the two challenges, given on Net force simulation Resource sheet.
- Select the Net force simulation.
- Challenge 1: Challenge students to create a scenario using at least one person in which the forces are balanced and the cart is not moving. Point out to students that the net or final force in this simulation is called the “Sum of forces”.
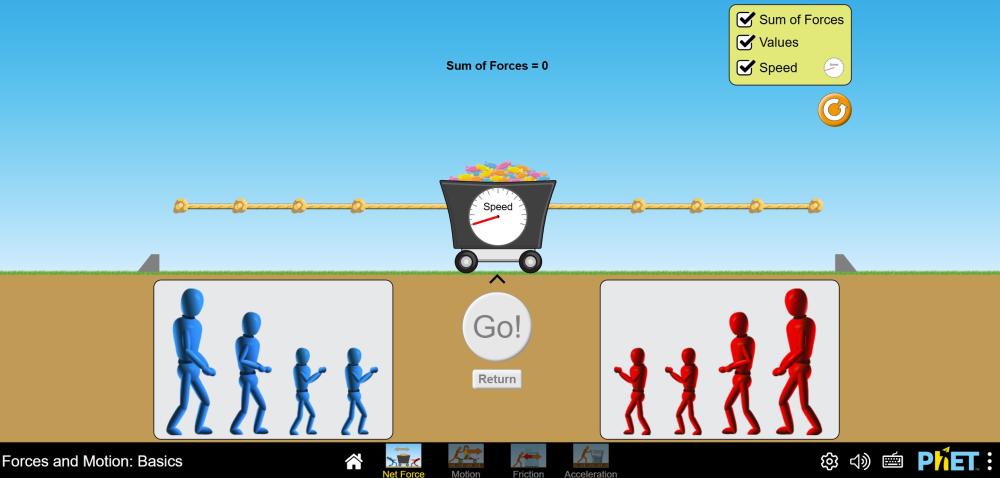
- Challenge 2: Challenge students to create a scenario using at least two people in which the forces are unbalanced.
✎STUDENT NOTES: Record the results of the challenges, draw a force diagram showing force arrows, and calculate the net force on the Net force simulation Resource sheet.
(Slide 21) Guide students in identifying the balanced and unbalanced forces on the barbell in the three pictures. Relate what students have learnt about balanced, unbalanced and net forces to the pictures.
- What are the forces acting on the barbell at each stage of the lift?
- The forces acting on the barbell are the downward gravitational force (weight) and the upward force from the lifter’s arms.
- When is the net force zero?
- The net force is zero when the barbell is not moving, such as when it is resting on the ground or being held still overhead.
- Which direction is the net force when the barbell is pulled upwards rapidly?
- When the barbell is moving upward rapidly, the net force is upward because the lifter is applying a greater upward force than the weight force. If the lifter dropped the barbell, then the net force would be downwards, as gravitational force is the only force acting on the barbell as it falls.
(Slide 22) In small groups, students work together to:
- choose a sport or physical activity.
- identify situations where forces are balanced and where forces are unbalanced.
- explain how these forces affect motion.
If students find choosing an activity or sport difficult, provide the following examples: tennis, golf, table tennis, air hockey or tug-of-war.
✎STUDENT NOTES: Write an explanation of how motion is affected in two situations where forces acting on an object are balanced and unbalanced in a chosen sport or physical activity.
Reflect on the lesson
You might invite students to:
- review the learning goals for the lesson and check for understanding.
- write a list of the important forces of a sport or physical activity to show in an infographic.
- identify five examples in their sport or physical activity where forces are acting in opposite directions on an object (like a person or piece of equipment). For each example, they need to record:
- what the object is.
- the two opposing forces.
- whether the forces are balanced or unbalanced.
- the evidence (e.g. “the bin isn’t moving → forces are balanced”).
- a force diagram for their favourite example.
- write a paragraph explaining why forces are important to playing or participating in their chosen sport or physical activity.
- add the words about forces covered in this lesson to their glossary.
Scientific models
There are many different reasons that models are used in science.
Models may be physical (globe or skeleton), mathematical (equations that represent relationships), computerised (global warming), or conceptual (diagram of the water cycle).
Models can be used to:
- understand complex systems by breaking large systems into manageable parts. For example, climate models can be used to simulate Earth’s atmosphere and oceans to understand weather patterns and climate change.
- make predictions about how different conditions would affect the outcome. For example, models of disease spread help to predict how a new illness could move through a population.
- safely test hypotheses that might be too dangerous, expensive or unethical to test in real life. For example, car test simulations.
- communicate ideas through visualising and explaining difficult concepts. For example, the Bohr model of the atom used by students.
- explore things that can’t be directly observed due to being too large or too small. For example, to model the solar system or the structure of DNA.
All models have limitations, and it is useful to discuss these with students whenever the models are used.
Models may be physical (globe or skeleton), mathematical (equations that represent relationships), computerised (global warming), or conceptual (diagram of the water cycle).
Models can be used to:
- understand complex systems by breaking large systems into manageable parts. For example, climate models can be used to simulate Earth’s atmosphere and oceans to understand weather patterns and climate change.
- make predictions about how different conditions would affect the outcome. For example, models of disease spread help to predict how a new illness could move through a population.
- safely test hypotheses that might be too dangerous, expensive or unethical to test in real life. For example, car test simulations.
- communicate ideas through visualising and explaining difficult concepts. For example, the Bohr model of the atom used by students.
- explore things that can’t be directly observed due to being too large or too small. For example, to model the solar system or the structure of DNA.
All models have limitations, and it is useful to discuss these with students whenever the models are used.