

Forces and sport
View Sequence overviewStudents will:
- describe magnetic force as a non‑contact force that can cause attraction and repulsion between magnetic objects.
- investigate to determine how magnetic force varies with distance.
- describe how magnets are used in magnetic braking systems in sport and physical activity to slow motion.
Students will represent their understanding as they:
- use models and diagrams to represent forces between two magnets with like and unlike poles.
- use models and diagrams to represent the pattern of magnetic force around magnets.
- conduct an investigation and infer the relationship between magnetic force and distance.
- compare the braking systems in a road bike (contact braking) and an exercise bike which uses magnetic braking.
In this lesson, assessment is formative.
Feedback might focus on students’ ability to:
- describe magnetic force as a force of attraction and repulsion on magnetic objects at a distance.
- represent the magnetic force around magnets in drawings of iron filings patterns.
- describe how magnets are used in magnetic braking systems in sport and physical activity to slow motion.
Potential summative assessment
Students working at the Achievement Standard should:
- represent and explain the effects of forces acting on objects.
- conduct safe, reproducible investigations to determine patterns.
- process data and information.
Refer to the Australian Curriculum content links on the Our design decisions tab for further information.
Whole class
Forces and sport Slides
Paperclip
Thread
Retort stand
Clamp
Bar magnet
Video: DIY eddy current braking demonstration for electromagnetic testing enthusiasts (0:12)
Each group
2 x bar magnets
3 x A4 paper
Marker/pencil
Saltshaker containing iron filings
Plastic sleeve or clingwrap
Each student
Individual science notebook
Forces and sport Poster
Magnetic force investigation Resource sheet
Lesson
The Inquire phase allows students to cycle progressively and with increasing complexity through the key science ideas related to the core concepts. Each Inquire cycle is divided into three teaching and learning routines that allow students to systematically build their knowledge and skills in science and incorporate this into their current understanding of the world.
When designing a teaching sequence, it is important to consider the knowledge and skills that students will need in the final Act phase. Consider what the students already know and identify the steps that need to be taken to reach the level required. How could you facilitate students’ understanding at each step? What investigations could be designed to build the skills at each step?
Read more about using the LIA FrameworkRe-orient
(Slide 74) Recall the previous lesson on the influence of gravitational force on the path of balls after they are thrown, shot, or kicked.
Recall the key features of gravitational force on objects:
- Gravitational force has magnitude and direction.
- Gravitational force can be represented using arrows.
- Gravitational force continuously accelerates a ball downward, causing its speed to change so that kicks, passes and shots follow curved paths as they rise and fall.
Discuss these key features in the context of golf, as shown on the slide.
Ask students to find two examples of gravity affecting motion on the Forces and sport Poster.
The Inquire phase allows students to cycle progressively and with increasing complexity through the key science ideas related to the core concepts. Each Inquire cycle is divided into three teaching and learning routines that allow students to systematically build their knowledge and skills in science and incorporate this into their current understanding of the world.
When designing a teaching sequence, it is important to consider the knowledge and skills that students will need in the final Act phase. Consider what the students already know and identify the steps that need to be taken to reach the level required. How could you facilitate students’ understanding at each step? What investigations could be designed to build the skills at each step?
Read more about using the LIA FrameworkIdentifying and constructing questions is the creative driver of the inquiry process. It allows students to explore what they know and how they know it. During the Inquire phase of the LIA Framework, the Question routine allows for past activities to be reviewed and to set the scene for the investigation that students will undertake. The use of effective questioning techniques can influence students’ view and interpretation of upcoming content, open them to exploration and link to their current interests and science capital.
When designing a teaching sequence, it is important to spend some time considering the mindset of students at the start of each Inquire phase. What do you want students to be thinking about, what do they already know and what is the best way for them to approach the task? What might tap into their curiosity?
Read more about using the LIA FrameworkMagnetic force in sporting equipment
Explain that in this lesson students will learn about magnetic force, which can affect motion without direct contact (similar to gravitational force).
(Slide 75) Introduce students to the use of magnets in three examples of sporting equipment—the Baitcaster fishing reel, stationary bike, and rowing machine. Explain that the magnets inside each piece of equipment, placed near a spinning metal disc, change the motion of the equipment. Invite students to discuss their experiences in using the equipment and how they think the motion changes as a result of magnets.
(Slide 76) Pose the question: How do magnets affect the motion of sporting equipment?
The Inquire phase allows students to cycle progressively and with increasing complexity through the key science ideas related to the core concepts. Each Inquire cycle is divided into three teaching and learning routines that allow students to systematically build their knowledge and skills in science and incorporate this into their current understanding of the world.
When designing a teaching sequence, it is important to consider the knowledge and skills that students will need in the final Act phase. Consider what the students already know and identify the steps that need to be taken to reach the level required. How could you facilitate students’ understanding at each step? What investigations could be designed to build the skills at each step?
Read more about using the LIA FrameworkThe Investigate routine provides students with an opportunity to explore the key ideas of science, to plan and conduct an investigation, and to gather and record data. The investigations are designed to systematically develop content knowledge and skills through increasingly complex processes of structured inquiry, guided inquiry and open inquiry approaches. Students are encouraged to process data to identify trends and patterns and link them to the real-world context of the teaching sequence.
When designing a teaching sequence, consider the diagnostic assessment (Launch phase) that identified the alternative conceptions that students held. Are there activities that challenge these ideas and provide openings for discussion? What content knowledge and skills do students need to be able to complete the final (Act phase) task? How could you systematically build these through the investigation routines? Are there opportunities to build students’ understanding and skills in the science inquiry processes through the successive investigations?
Read more about using the LIA FrameworkInvestigating magnetic force
Explain to students they will be conducting an investigation to examine magnetic force between two magnets and determine where magnetic force is strongest.
(Slide 77) Provide students with the Magnetic force investigation Resource sheet. Allow time for student groups to read through the investigation for the question What is magnetic force?.
- Place two bar magnets on a flat surface so that the north pole of one magnet is facing the south pole of the other.
- Slide the north pole of the magnet closer to the south pole of the other magnet. Record your observations.
- Move the magnets so that their north poles are facing.
- Slide the north pole of one magnet towards the north pole of the other magnet. Record your observations.
✎STUDENT NOTES: Write a prediction for this investigation.
(Slide 78) Allow students time to complete the investigation and record their results. Guide students to conclude that like magnetic poles attract and unlike magnetic poles repel. Students could also observe how the strength of the force they felt varies with the distance between the magnets.
✎STUDENT NOTES: Record the observations of the investigation in the results table.
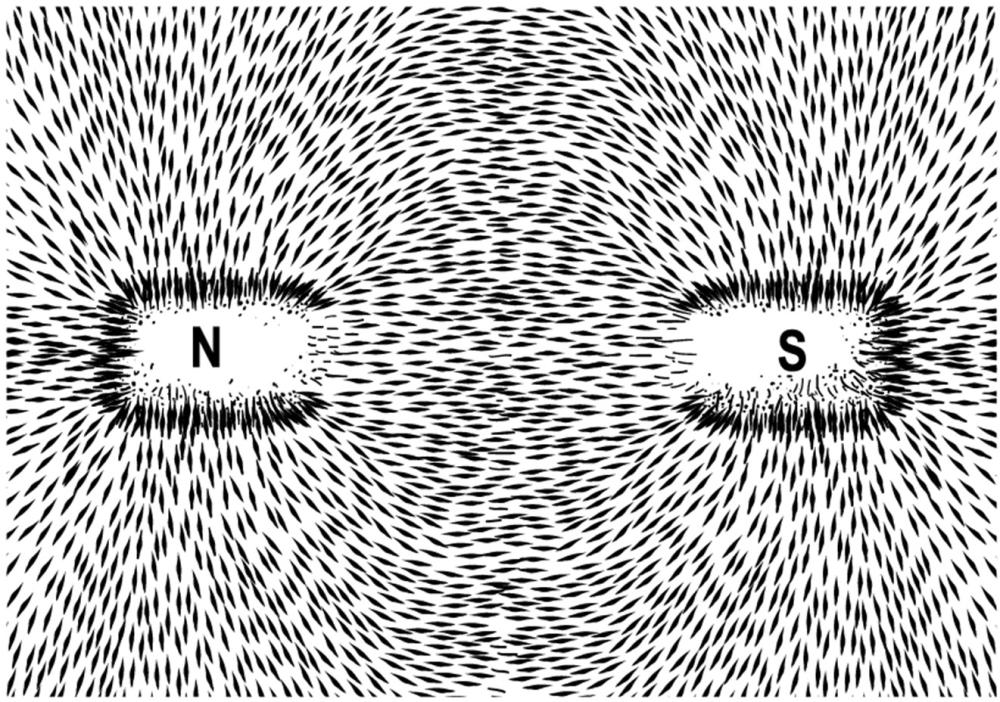
(Slide 79) Explain that magnetic force cannot be seen directly, but its effects can be observed when iron filings align in patterns around a magnet. Allow time for student groups to read through the investigation for the question Where is magnetic force strongest?.
- Lay two magnets in a plastic sleeve on a flat surface, with the north pole on one magnet facing the north pole of the other magnet. Place a piece of A4 paper over the magnets. Trace the outline of each magnet and label the ‘N’ and ‘S’ poles on each outline.
- Gently shake the iron filings over the paper, focusing on where the magnets are and the surrounding area. Gently tap the paper to spread the iron filings evenly around the magnet if necessary.
- Draw the iron filings pattern in the results table.
- Lift the paper and carefully pour the iron filings back into the saltshaker.
- Move the magnets so that the north pole of one magnet is facing the south pole of the other magnet. Place a piece of A4 paper over the magnets. Trace the outline of each magnet and label the ‘N’ and ‘S’ poles on each outline.
- Gently shake the iron filings over the paper, focusing on where the magnets are and the surrounding area. Gently tap the paper to spread the iron filings evenly around the magnet if necessary.
- Draw the iron filings pattern in the results table.
- Lift the paper and carefully pour the iron filings back into the saltshaker.
✎STUDENT NOTES: Write a prediction for this investigation.
(Slide 80) Allow students time to complete the investigation and record their observations.
✎STUDENT NOTES: Record observations from the investigation, including annotations indicating where the iron filing patterns are most dense and where they are more spread out.
Magnetism
Magnets attract or repel each other because of a magnetic force that acts at a distance.
Magnetic force and magnets
Magnetic force arises from magnets, which come in many shapes, sizes and strengths but all share a common feature: they have both a north pole and a south pole. These poles always occur together; magnetic monopoles have never been observed. Whether on very large scales, such as paired magnetic poles in sunspots, or at very small scales within atoms, north and south poles are inseparable. If a magnet is cut in half, each piece becomes a smaller magnet with its own north and south pole.
This pairing helps explain one of the key behaviours of magnetic force: like poles repel each other, while unlike poles attract. A north pole repels another north pole because their magnetic fields oppose one another, while a north pole attracts a south pole as their magnetic fields align.
Magnetic force and distance
Magnetic force acts at a distance and is represented using the idea of a magnetic field, which shows how the force extends through space around and between magnets. Magnetic fields are commonly visualised using magnetic field lines, which indicate the direction a small compass would point at different locations. These lines form continuous, closed loops that run from the north pole to the south pole outside the magnet and back through the magnet itself. They never cross, and their spacing gives a visual indication of field strength—closer lines show a stronger magnetic effect, particularly near the poles.
While terms such as “magnetic field strength” and “magnetic flux” are used to describe how strong a magnetic field is or how many magnetic field lines pass through the surface of a given area, it is important for students to understand that field lines themselves are a representational tool, not physical objects, used to show how magnetic forces extend outward from a magnet and affect nearby objects.
Magnetic force and magnets
Magnetic force arises from magnets, which come in many shapes, sizes and strengths but all share a common feature: they have both a north pole and a south pole. These poles always occur together; magnetic monopoles have never been observed. Whether on very large scales, such as paired magnetic poles in sunspots, or at very small scales within atoms, north and south poles are inseparable. If a magnet is cut in half, each piece becomes a smaller magnet with its own north and south pole.
This pairing helps explain one of the key behaviours of magnetic force: like poles repel each other, while unlike poles attract. A north pole repels another north pole because their magnetic fields oppose one another, while a north pole attracts a south pole as their magnetic fields align.
Magnetic force and distance
Magnetic force acts at a distance and is represented using the idea of a magnetic field, which shows how the force extends through space around and between magnets. Magnetic fields are commonly visualised using magnetic field lines, which indicate the direction a small compass would point at different locations. These lines form continuous, closed loops that run from the north pole to the south pole outside the magnet and back through the magnet itself. They never cross, and their spacing gives a visual indication of field strength—closer lines show a stronger magnetic effect, particularly near the poles.
While terms such as “magnetic field strength” and “magnetic flux” are used to describe how strong a magnetic field is or how many magnetic field lines pass through the surface of a given area, it is important for students to understand that field lines themselves are a representational tool, not physical objects, used to show how magnetic forces extend outward from a magnet and affect nearby objects.
The Inquire phase allows students to cycle progressively and with increasing complexity through the key science ideas related to the core concepts. Each Inquire cycle is divided into three teaching and learning routines that allow students to systematically build their knowledge and skills in science and incorporate this into their current understanding of the world.
When designing a teaching sequence, it is important to consider the knowledge and skills that students will need in the final Act phase. Consider what the students already know and identify the steps that need to be taken to reach the level required. How could you facilitate students’ understanding at each step? What investigations could be designed to build the skills at each step?
Read more about using the LIA FrameworkFollowing an investigation, the Integrate routine provides time and space for data to be evaluated and insights to be synthesized. It reveals new insights, consolidates and refines representations, generalises context and broadens students’ perspectives. It allows student thinking to become visible and opens formative feedback opportunities. It may also lead to further questions being asked, allowing the Inquire phase to start again.
When designing a teaching sequence, consider the diagnostic assessment that was undertaken during the Launch phase. Consider if alternative conceptions could be used as a jumping off point to discussions. How could students represent their learning in a way that would support formative feedback opportunities? Could small summative assessment occur at different stages in the teaching sequence?
Read more about using the LIA FrameworkMagnetic force & sports equipment
(Slide 81) Discuss the combined results of the investigation. Highlight:
- Magnets exert force without touching other magnets or objects.
- An attractive magnetic force existed between unlike poles.
- A repulsive magnetic force existed between like poles.
- Magnetic force changes with distance.
- The force felt stronger when the magnets were closer.
- The iron filings pattern showed that magnetic force is strongest near the magnet, particularly at the poles, where the filings were thickest, and weaker farther away.
- When you brought two magnets close together, what happened when the same poles faced each other?
- What happened when different poles were brought close together?
- How did the strength of the push or pull change as you moved the magnets closer together or further apart?
- When you sprinkled iron filings around the magnets, where did the filings gather the most?
- How did the pattern of iron filings differ near the ends of the magnets compared to the middle?
- How did the pattern of the iron filings differ closer to the magnets compared to farther out?
✎STUDENT NOTES: Complete the discussion questions on the Magnetic force investigation Resource sheet.
Explain that magnets are found in some sporting equipment like rowing machines and exercise bikes and in some fishing reels. Explain that in this equipment magnets provide resistance or a braking force that slows moving parts without direct contact.
Remind students of two key findings from the investigation:
- Magnets exert a force without touching (non-contact force).
- Magnetic force is stronger closer to the magnet.
Explain that these ideas help understand how magnets can be used to control motion.
Demonstrate how the motion of a magnetic object can be slowed or stopped by a magnet.
- Attach a paperclip to a length of thread suspended from a clamp on a retort stand.
- Position a bar magnet upright on the bench or laboratory surface approximately 1 cm below the paperclip.
- Gently swing the paperclip so that it passes over the magnet.
- Observe how the paperclip slows and eventually stops above the magnet.
Explain that in exercise equipment and fishing reels, magnets are used differently. Rather than attracting a magnetic object, they slow the motion of a nearby spinning non-magnetic disc (typically aluminium) without touching it. This process is called magnetic braking.
Note: Year 7 students are not expected to understand the underlying phenomenon of magnetic braking, but they can appreciate it as an effective demonstration of magnetic force in action.
Demonstrate magnetic braking or show an example of this phenomenon by showing DIY eddy current braking demonstration for electromagnetic testing enthusiasts (0:12).
(Slide 82) Using the images on the slide, explain that the magnets are not attracted to the aluminium disc or spool, but instead create a magnetic force that causes resistance, slowing the motion of the disc.
Highlight the relationship: Magnets move closer → resistance to motion increases → motion slows. Specifically:
- For fishing reels:
- Magnets placed near a spinning aluminium spool inside the reel create a magnetic braking force.
- This slows the motion of the spool, preventing it from spinning too fast and helping to control the cast.
- For cycling or rowing machines:
- Magnets positioned near, but not touching, a spinning flywheel create a magnetic braking force.
- Resistance makes pedalling or rowing more challenging.
- The resistance can be adjusted by changing the distance between the magnets and the flywheel.
(Slide 83) In small groups, students compare the braking systems in a road bike (contact braking) and an exercise bike which uses magnetic braking. Explain that students will have to use their understanding about magnetic braking from this lesson and frictional force from Lesson 5.
- Which system has parts that touch?
- Which system might make more noise?
- Which system would wear out faster?
- Which system might require more maintenance?
- Which system allows more precise control of braking?
✎STUDENT NOTES: Record the similarities and differences of the two braking systems in a table.
| Contact braking | Non-contact braking | |
| Noise during braking | Brake pads rub against the wheel rim or disc, often producing noise during braking. | No physical contact between parts, so braking operates more quietly. |
| Wear and tear | Friction causes brake pads and braking surfaces to wear down over time and require replacement. | Very little wear occurs because the magnets do not touch the moving parts. |
| Heating | Heat is produced because of contact friction, causing brake components to become hot during use. | Less heat is generated because braking occurs without rubbing surfaces together. |
| Control of resistance | Braking force is controlled by increasing or decreasing the pressure of the brake pads on the wheel. | Braking force can be adjusted by changing the distance between the magnets and the spinning disc or flywheel, allowing for fine control of resistance or casting. |
| How the braking force is produced | Friction between two surfaces slows the motion. | Magnetic forces create resistance that slows the motion without contact. |
Reflect on the lesson
You might invite students to:
- learn more about magnets using the PhET Magnets and electromagnets computer simulation model.
- define and describe “magnetic force” in their glossary.
- watch Magnet braking on a skateboard (3:01), showing the effect of adding magnetic braking to a skateboard going down a ramp.
design a vertical video ad that advertises either a magnetic braking reel used in fishing or exercise equipment using magnetic braking such as rowing machines, exercise bikes or treadmills. They should create a 3-frame storyboard for a vertical ad showing:
- a hook (the problem the equipment solves).
- an explanation of the push and pull forces and the science concepts involved, including arrows.
- a selling point (why the technology is better).
Students share their design with another person in under 15 seconds and receive feedback on their communication of the science concepts covered in this lesson.
Magnetic braking
Magnetic braking effectively demonstrates how magnetic force can change an object’s motion.
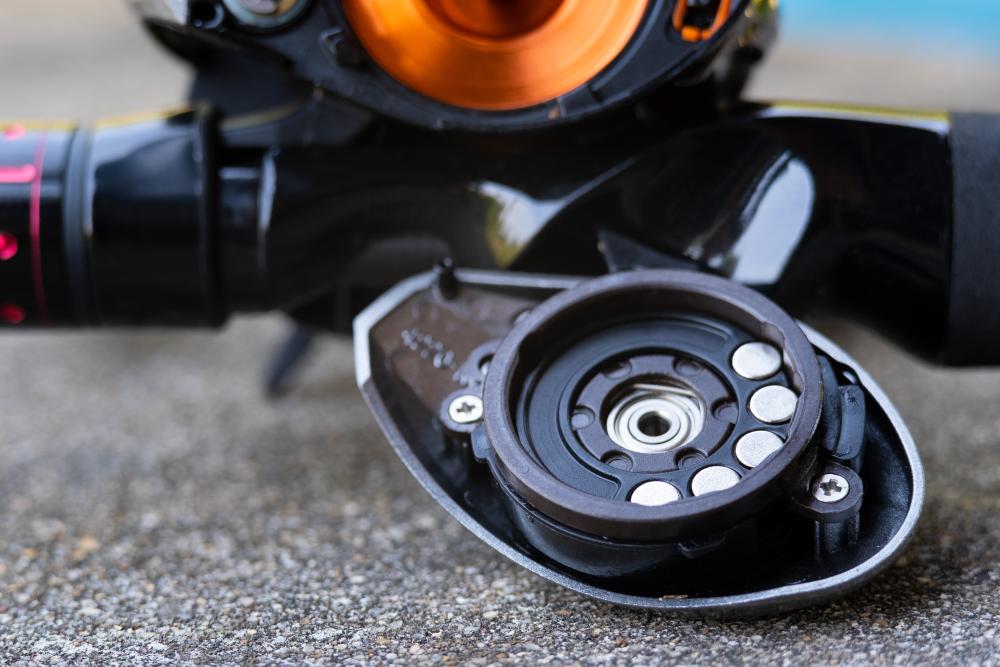
Magnetic braking occurs when a piece of metal moves relative to a nearby magnet and slows down, even though there is no direct contact. As the metal moves with relative motion through the magnetic field, small circulating electric currents, called “eddy currents”, are induced in the metal. These currents create their own magnetic field, which in turn exerts a force that opposes the motion of the metal and slows the metal down.
This effect can be seen when a spinning metal disc stops quickly between strong magnets—not because the metal is magnetic, but because of this induced force.
Magnetic braking is used in everyday applications such as fishing reels, where it controls spool speed, and in exercise bikes and rowing machines, where it provides smooth, adjustable resistance without physical contact or friction.
Year 7 students are not expected to understand the underlying phenomenon, but they can appreciate it as an effective demonstration of magnetic force in action. Magnetic braking can be easily and quickly demonstrated using a retort stand, a sheet of aluminium metal placed on a surface, a piece of string tied to the retort stand and a steel nut, and a neodymium magnet which when attached to the string and nut is close to, but not touching the aluminium sheet. Swing the magnet over the aluminium sheet as shown in the video below.
Magnetic braking occurs when a piece of metal moves relative to a nearby magnet and slows down, even though there is no direct contact. As the metal moves with relative motion through the magnetic field, small circulating electric currents, called “eddy currents”, are induced in the metal. These currents create their own magnetic field, which in turn exerts a force that opposes the motion of the metal and slows the metal down.
This effect can be seen when a spinning metal disc stops quickly between strong magnets—not because the metal is magnetic, but because of this induced force.
Magnetic braking is used in everyday applications such as fishing reels, where it controls spool speed, and in exercise bikes and rowing machines, where it provides smooth, adjustable resistance without physical contact or friction.
Year 7 students are not expected to understand the underlying phenomenon, but they can appreciate it as an effective demonstration of magnetic force in action. Magnetic braking can be easily and quickly demonstrated using a retort stand, a sheet of aluminium metal placed on a surface, a piece of string tied to the retort stand and a steel nut, and a neodymium magnet which when attached to the string and nut is close to, but not touching the aluminium sheet. Swing the magnet over the aluminium sheet as shown in the video below.